Everything on a drilling rig directly or indirectly assists the bit in crushing or cutting through objects. Although there are almost limitless ways a drill bit can be used, which can either be for grinding a rock, puncturing a hole through irons or drilling through aluminum, all this are only possible when the bit is new and sharp. Most bits work by scraping or crushing through objects, or even both, while some bits known as hammer bits’ pound’s object vertically in much the same fashion as a construction site air hammer, and that is possible because of its general rotational motion.
Most drill bits used in making jewelry becomes dull with normal usage, and the worn cutting edges often make tasks even more difficult, resources consuming and can cause expensive accidents, which includes damage to jewelry and gemstones or even an injury to the body.
When a bit becomes excessively dull or stops making progress; the recommended thing to do is to change it, but what if there is no replacement at the moment or there is a limited supply of drill bit? The next thing to do is sharpen it.
Proper maintenance of a drill bit includes keeping it clean, sharp, and consistent usage at the bench.
Follow the outlined steps below carefully, and learn how to sharpen drill bits by hand. By the end of this article, you will inevitably turn your used, dull, and useless drill bit back into a hole blasting instrument at its prime.
Materials Needed
- A dull drill bit
- You will be needing a belt sander or a portable drill bit grinder like the bench grinder
- A cup/bowl of cold water
PRECAUTIONS!
- Your hands will be near to the drill bit sharpener device described in this post, and you will dangerously be at risk of skin injury, so be careful.
- For your safety; stay away from putting on any gloves while implementing this method because they can get trapped into the drill bit sharpening machine and in the process you might get dragged in unaware.
- Put on safety glasses and always be mindful of where you stand while making use of the drill bit grinding machine.
- The procedure in this steps will heat the drill bit’s face up, so getting a cup of cold water readily available by your side to dip the tip of the drill bit into is advisable to cool it off.
Step 1: Prep your Drill Bit
Although this is not a tutorial on how to sharpen drill bits with a file, but you need to prepare your bit by running a file across any burrs that might be on the shank of the bit. If at all anything is to go wrong while making use of this method, I am very sure you do not want those nasty burrs to cut through into your skin.
Step 2: Select your Preferred Sharpening Tool
You might be the type of guy that prefers a bench grinder to the belt sander or vice versa when it comes to sharpening drill bit, but I can assure you that either of these two will work well for sharpening the bits back to its prime. All you have to do is ensure that the safety guards on the machine are less than 1/8″ away from the belt or wheel so that the dead and dull bit we are trying to resurrect doesn’t get caught between the guard!
Step 3: Get Familiar with Holding the Bit
To avoid getting caught up in a weird position or being alien to the whole process of sharpening with your hand you need to get familiar and comfortable with holding the bit against the machine. You need to be in a position that is most comfortable for you with your hand against the machine support, then hold the drill bit with both of your hands. It is best if the bit maintains a 60-degree angle to the face of the grinder belt sander.
Step 4: Trim off the Landing
Place the end of the bit landing directly against the grinder belt, and then move it across the belt into the finish position by hoisting up your left hand and applying pressure to the drill bit sharpener simultaneously. Always make sure your right-hand stays stationary, and just its fingers are guiding the drill bit.
Step 5: Cast the Chisel & Shape the Landing
Through the motion of moving your left hand towards your right, a chisel angle will be created but will not be perfect straight away. So you need to repeat the motion few more times until the chisel angle is approximately 45 degrees from the lip, and by the continuous rotation or rolling of the drill bit counterclockwise, a rounded landing that gives more support to the lip will be created.
Step 6: Make a Perfect Finish to the Drill Bit
By combining all three actions of shaping, cutting and rotating while using the drill bit sharpening machine, a perfect cut on the drill face will be the by-product. However, you need to repeat this actions more than a few times and rotate the drill bit at approximately 180 degrees while holding it in your hand to sharpen the other lip.
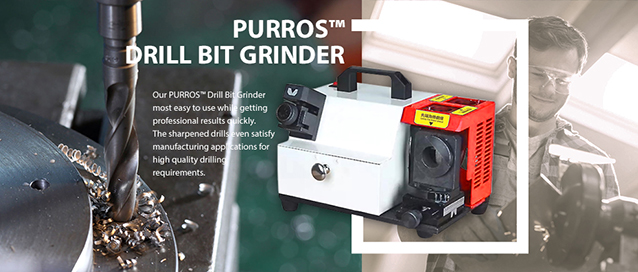
There are some technical requirements for sharpening drill bits by hand, but if you use a fully automatic drill bit grinding machine which producted by PURROS, you will save a lot of trouble. You don’t need to rely on experience to decide if the drill is being grinded or finished. If you use the automatic drill bit grinder, the grinding process is in place, and the accuracy is relatively high. To learn more about the drill bit grinding machine, please click on our product page.